Why Learning Centers Matter
The Case for Centers
Learning centers work because they separate practice from instruction. While you work with a small group, the rest of your class isn't waiting — they're applying skills they've already been taught, working independently or with peers, and building the kind of routine that makes your classroom run.
What Centers Are For
Centers are practice environments, not introduction environments. The activities students do at centers should reinforce concepts you've already taught — not introduce new material. This distinction matters. If students are encountering something for the first time at a center, they'll struggle without support, and your management problems will follow.
Done well, centers give you two things at once: structured independent practice for most students and uninterrupted small-group time for you.
Four Things Centers Do Well
Repetition and practice build retention. Centers give students repeated exposure to skills in varied formats without requiring direct teacher time.
Group work at centers builds communication and accountability. Students explain their thinking, check each other's work, and navigate disagreement — all useful skills beyond the academic content.
When students are productively occupied, you can pull individuals or small groups for reteaching or enrichment without disrupting the class.
Centers teach students to follow directions, manage materials, and sustain focus without constant teacher direction. That independence compounds over time.
Getting Started with Centers
Before You Set Anything Up
Before you choose a single activity or print a single task card, there are three things you need to get right. Miss any one of them and you'll be managing problems instead of teaching. Nail all three and the rest falls into place.
Student Age
Younger students need more structure, simpler materials, and shorter rotations. Older students can handle more complex tasks, longer work periods, and greater independence. Calibrate accordingly.
K–1 students do well with tactile materials — sand trays, manipulatives, physical card sets. Grades 3–4 and up can work with laptops, whiteboards, and written task cards.
Match cognitive demand to where students actually are. A center that's too hard becomes a behavior problem. A center that's too easy becomes a distraction.
Consider whether students work best at desks, tables, or on the floor. Different centers may call for different configurations within the same room.
Every center should map to a specific learning objective. If you can't articulate why a center exists, it shouldn't be there.
Maximizing Classroom Layout
Your room layout is a management tool. A poorly arranged room creates traffic jams, noise bleed between centers, and unclear boundaries — all of which cost you time and attention.
Before placing anything, identify where you'll run small-group instruction. Every other decision flows from that spot — you need clear sightlines to all centers from your teaching table.
Use shelving, furniture, or floor tape to give each center a distinct physical footprint. Clear boundaries reduce traffic conflicts, contain noise, and make it obvious to students where one center ends and another begins.
Assign every material a labeled home in a center-specific bin. Students should be able to retrieve and return everything without asking you. If they can't, the system isn't labeled well enough.
Choosing the Right Type of Centers
What it is:Math centers build fluency and reinforce number concepts through hands-on practice and games.
Examples:Math fact fluency drills, telling time with analog clocks, counting money with real coins, place value games, and manipulative-based activities using the M.A.T.H. rotation structure.
Tip:Math centers are also your best opportunity to pull small groups for reteaching or enrichment. Protect that time — it's one of the core reasons centers exist.
What it is:Reading centers develop decoding, fluency, and comprehension through leveled texts and targeted activities.
Examples:Leveled readers, decodable texts aligned to your phonics scope and sequence, listening practice with headphones, and online reading programs.
Tip:Always pair independent reading with a follow-up task — a retell, a drawing, or a written response. Reading without accountability drifts.
What it is:Writing centers give students structured opportunities to practice composition, handwriting, and creative expression.
Examples:Prompted writing with a card ring or choice board, handwriting practice on lined whiteboards, poetry forms with templates, and collaborative storytelling activities.
Tip:Build in a clear accountability piece — a sentence minimum, a share-out, or a finished product — so students have a concrete reason to engage.
What it is:STEM centers give students a chance to think through problems, test ideas, and build things — without you directing every step.
Examples:Building challenges with blocks or craft materials, simple science experiments with clear steps, pattern and sorting activities, and introductory coding programs.
Tip:STEM centers tend to run louder and busier than other types — position them accordingly, and build a clear cleanup protocol in from the start.
What it is:Art centers serve a practical purpose beyond creative expression — they give students a productive, lower-stakes task between more cognitively demanding work.
Examples:Drawing, painting, and crafting activities. Can connect directly to other subjects — illustrating a story, representing a math concept visually, or responding to a read-aloud through drawing.
Tip:Keep materials simple and organized in labeled bins. The easier cleanup is, the more likely students are to actually do it.
Best Practices for Centers
Running centers well comes down to a handful of non-negotiables. These aren't suggestions — they're the practices that determine whether your centers run independently or require constant intervention. Walk through each one before you launch.
Students can't meet expectations they don't know about. Before you run a single rotation, make sure every student understands what working at each center looks like — how to handle materials, what to do when finished, and how to get help without interrupting your small-group time.
Walk students through each center explicitly — where materials live, what the task looks like, what done means, and what to do if they finish early. Treat the first few days as rehearsal, not instruction.
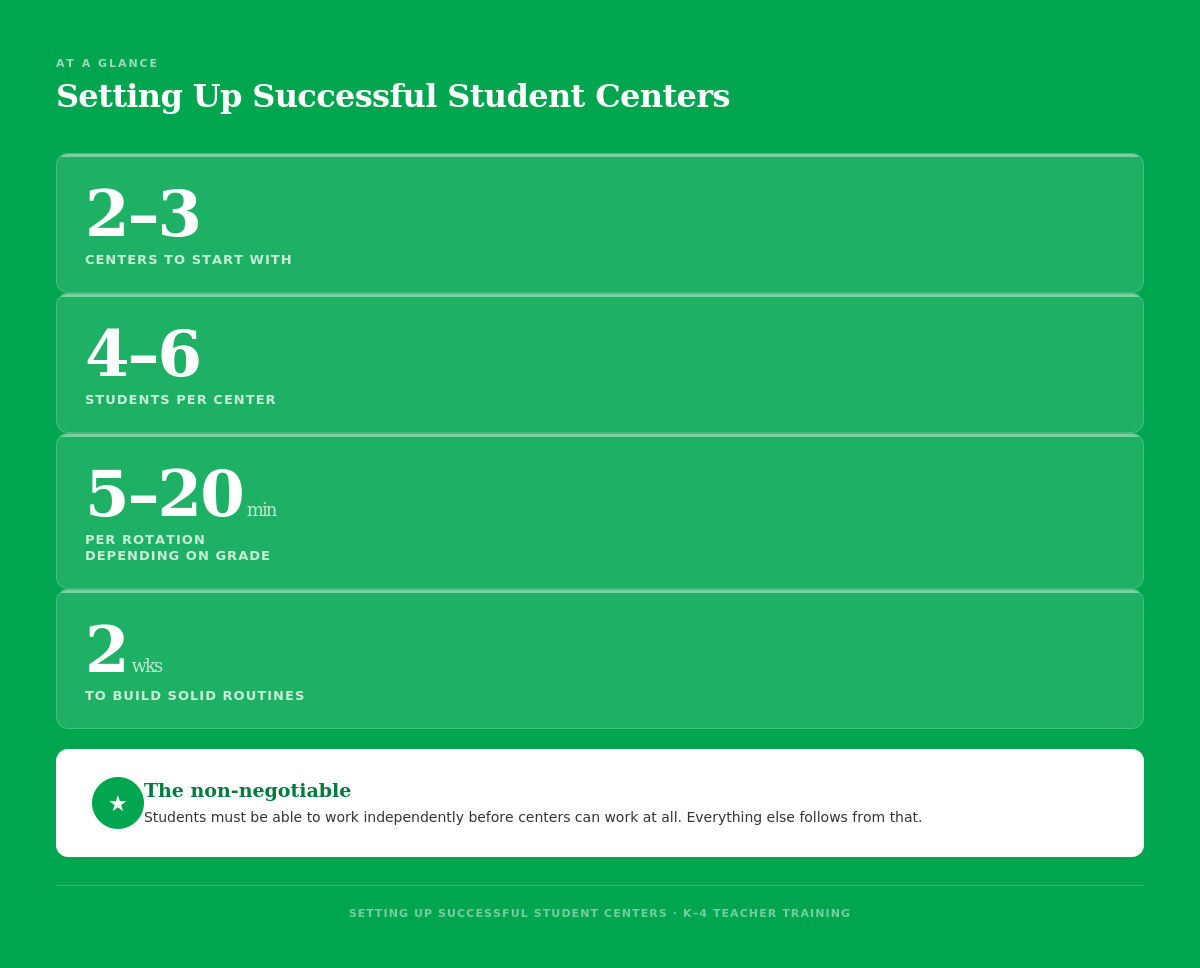
The goal is small groups — typically 4 to 6 students per center. Work backward from your class size. A class of 24 needs at least 4 centers to keep groups manageable. More centers means smaller groups, which means less noise and better focus.
Kindergartners and first graders typically max out around 5–10 minutes, and may need shorter rotations early in the year. Grades 2–3 can handle 8–12 minutes. Grade 4 and up can sustain 15–20 minutes with solid routines. Start shorter than feels necessary and extend gradually.
Every center needs a defined end state. Materials back in labeled bins, surface clear, chairs pushed in. Post a visual so students can check their own work without asking you.
Your first week of centers will show you exactly where your design needs work. Watch where students stall, where transitions drag, and where independent work breaks down. Centers improve when you treat the first few weeks as a rough draft, not a final product.
Reading and Writing Center Ideas
How to Use This Lesson
ELA centers give students structured practice time with skills you've already taught. The activities in this lesson are organized by skill area — phonics, comprehension, and writing — so you can build centers that connect directly to your current instruction. Use what fits your students' needs and leave the rest.
Word Work Centers
What it is:Phonogram practice gives students repeated exposure to letter-sound relationships through hands-on or digital activities. The goal is automatic recognition — students should identify phonograms quickly and accurately without stopping to think.
Examples:Physical letter tiles, printable card sets, or an interactive digital phonogram chart. Students work through each phonogram and say the sound aloud. Works well as a fully independent center once students have been introduced to the tool.
Tip:Make sure students have headphones if using a digital tool, and walk them through how to use it before center time starts. An unfamiliar interface will stall the whole center.
What it is:Structured activities that give students repeated practice with spelling patterns in a format that sustains engagement longer than a worksheet.
Examples:Word-building games, partner whiteboard activities, or card-based games targeting specific spelling patterns. Sensory options like writing words in sand trays or shaving cream add a tactile element that works particularly well for younger students.
Tip:Match difficulty to your current spelling scope and sequence. Games that are too easy lose students quickly, and games that are too hard become a management problem. Rotate activities periodically to maintain engagement without rebuilding the center from scratch.
What it is:Sensory spelling activities use tactile materials to help students practice and internalize spelling patterns. The physical element adds engagement that straightforward writing tasks don't provide — particularly effective for K–2.
Examples:Writing words in sand trays, shaving cream, or with magnetic letters. Small whiteboards also work well. The activity pairs fine motor practice with phonics reinforcement.
Tip:Provide a word list or prompt card so students know exactly what to practice. Open-ended sensory activities without a clear task tend to become play rather than practice. Build cleanup time into the rotation.
What it is:Phonemic awareness games develop students' ability to hear, identify, and manipulate individual sounds in words. These are listening and speaking activities — no reading or writing required — making them accessible for your youngest or lowest-skilled students.
Examples:Rhyming games, sound segmenting activities, and sound-matching tasks using cards, pictures, or manipulatives. Partner formats work well — students can check each other's answers without teacher involvement.
Tip:Start simple and increase complexity as students' skills develop. Sequence activities to match where students actually are, not where the curriculum says they should be.
Writing Center Activities
What it is:A clear starting point for independent composition. A good prompt removes the "I don't know what to write" problem and gets students producing text quickly without teacher support.
Examples:Seasonal or open-ended prompts on a card ring or choice board. Keep prompts concrete for K–1 and more open-ended for grades 3 and up. A choice board with 6–8 options lets students self-direct without the center becoming a free-for-all.
Tip:Rotate prompts regularly and build in a simple accountability piece — a sentence minimum, a drawing requirement, or a share-out — so students have a reason to take the work seriously.
What it is:Structured repetition with letter formation and writing fluency. For K–2 especially, handwriting automaticity directly affects writing output — students who struggle to form letters spend cognitive energy on mechanics instead of composition.
Examples:Lined whiteboards for repeated practice, letter tracing sheets, and print or cursive alphabet models for reference. Partner checking works well — one student writes, the other compares to the model.
Tip:Keep the task narrow. Students should know exactly which letters or words they are practicing and what a correct model looks like. Vague tasks produce vague effort.
What it is:A structured creative writing task with clear constraints. The form does the heavy lifting — students focus on word choice and expression rather than figuring out how to organize their writing.
Examples:Acrostic poems, haiku, and free verse work well as center activities. Provide a template and a completed example for each form. Students shouldn't need to reinvent the structure — they need practice using it.
Tip:Introduce each poetry form during whole-group instruction before it appears at the center. Students who haven't seen the form before will spend center time confused rather than writing.
What it is:A structured group writing activity where students build a shared narrative together, one contribution at a time. Develops narrative awareness without requiring sustained independent composition.
Examples:One student writes an opening sentence and passes the paper to the next, who adds the next line. A shared whiteboard where each student adds before stepping back also works well.
Tip:Set a clear constraint — one or two sentences per turn — so no single student dominates the narrative. Groups of three to five work best. Larger groups mean too much waiting and not enough writing.
Reading Practice Centers
What it is:Independent reading practice at a text complexity that matches each student's current decoding and comprehension skills. The goal is fluency and confidence — students should be able to read with minimal struggle.
Examples:Any leveled text library. Students read independently, with a partner, or take turns reading aloud. Follow up with a simple comprehension task — draw a scene, sequence the events, or respond to a prompt on an index card.
Tip:Match text to actual reading level, not grade level. A student who is stuck on unfamiliar words is not building fluency — they are practicing frustration. Update leveled groups regularly as skills develop.
What it is:Short texts written to align with a specific phonics scope and sequence. Students apply phonics patterns they've already been taught to read independently. Most effective when the text matches current phonics instruction.
Examples:Short decodable readers aligned to your current phonics unit. Pair with a follow-up task — underlining a target phonogram, sorting words by pattern, or writing a sentence using a target word.
Tip:Decodable texts only work as a center activity if students have already been taught the patterns in the text. If the patterns are new, save the text for guided instruction — not independent practice.
What it is:Audio-supported reading that models fluent reading, builds comprehension, and supports students who aren't yet reading independently. Students follow along with a text while listening to a fluent reader.
Examples:Websites or apps that read texts aloud while students follow along. Works well for students who need fluency modeling or who are working below grade level. Requires headphones and a device set up before the rotation starts.
Tip:Pair the listening activity with a simple response task — a drawing, a retell, or a written answer to one question. Students who have something to produce while they listen stay engaged longer.
What it is:Interactive phonics and comprehension practice in a format that sustains independent engagement. A legitimate practice tool when used with intention — not a reward or free-choice screen time.
Examples:Starfall, getepic.com, and Storyline Online are reliable options across K–4. Match the platform to your instructional focus — some are stronger for phonics, others for comprehension and fluency.
Tip:Assign a specific activity rather than letting students choose freely. Know what skill you are targeting and why before you put a platform in the rotation. Open-ended screen time drifts quickly.
Math Center Ideas and Strategies
Math centers give students a chance to build fluency, apply skills hands-on, and reinforce concepts they've already learned. They're also your best opportunity to pull small groups for reteaching or enrichment. Protect that time — it's the reason centers exist.
The M.A.T.H. Structure
A simple acronym that gives your rotation a predictable shape students can internalize quickly. Not every session needs all four — use the structure as a framework, not a checklist.
What it is:Independent fluency practice focused on speed and automaticity with basic math facts. Students should be able to run this center with minimal setup and no teacher involvement once routines are established.
Examples:Flash cards, triangle cards, dice games (roll and add, roll and multiply), or digital fact fluency programs such as XtraMath or Reflex Math.
Tip:Build a stretch task into the center materials for students who finish early. A center without a next step becomes a management problem after two minutes.
What it is:Lower-intensity independent practice using worksheets, journals, or digital programs. Designed to run without materials management or teacher involvement. This is your buffer center — reliable, quiet, and self-contained.
Examples:Review worksheets aligned to current unit, problem-solving prompts, spiral review notebooks, or adaptive learning programs.
Tip:Keep this center truly independent — if students need to ask questions, the task is too hard for center time. Save new or challenging work for guided instruction.
What it is:Your small-group table. This is where you reteach, assess, or extend — and it's the reason the rest of centers exist. While other students rotate through M, A, and H, you're doing your most targeted instructional work here.
Examples:Guided math groups, formative assessment conversations, reteaching a concept from the previous lesson, enrichment tasks for students who are ahead.
Tip:Protect this time. If you're leaving your table to troubleshoot other centers, your independent centers aren't ready yet. Simplify the other three before you expand them.
What it is:Manipulative-based and game-based activities that reinforce number sense, place value, geometry, or any concept that benefits from physical interaction with materials.
Examples:Telling time with analog clocks, counting and matching coins, place value blocks, fraction tiles, tangrams, pattern blocks, or board-style review games.
Tip:Label everything and store in center-specific bins. Cleanup should be automatic — post a visual showing exactly how each bin should look when the rotation ends.
Grouping and Managing Students
How you group students and how you manage rotations are two separate decisions that work together. Grouping is an instructional choice. Management is a logistics choice. Get both right and centers operate largely without you. Get either one wrong and you'll spend center time putting out fires instead of teaching.
Grouping Strategies
What it is:Students are grouped based on their current proficiency in a specific skill. Gives you control over who you're pulling for small-group instruction and ensures center tasks are appropriately matched to where each group actually is.
Examples:Assign color-coded group names — blue group, green group, red group — rather than ability labels. Rotate group assignments as skills develop so groupings don't feel permanent.
Tip:Use color groups so students aren't aware of the grouping rationale. The social dynamics around perceived ability levels are real, especially in upper elementary — neutral labels protect students and keep the focus on the work.
What it is:Groups contain students at different skill levels. Stronger students support peers, and the act of explaining reinforces their own understanding. Useful for collaborative tasks where the process matters as much as the product.
Examples:Collaborative storytelling, partner reading, group problem-solving tasks, or any center where discussion and peer interaction are built into the activity.
Tip:Assign roles within the group so participation is structured rather than assumed. Without roles, mixed-ability groups tend to default to one student doing most of the work.
What it is:Students select their own center or group. Works best as an occasional incentive rather than a default — choice that's earned is more motivating than choice that's always available.
Examples:Friday centers as a reward for meeting expectations throughout the week. End-of-unit celebration rotations where students revisit favorite activities.
Tip:Set clear parameters before offering choice — students select from a defined list of options, not anything they want. Unlimited choice creates logistics problems and students quickly learn to game it.
What it is:Groups are assigned through a neutral, non-academic method. Useful for breaking social patterns, keeping groupings from feeling fixed, and adding an element of novelty that students often enjoy.
Examples:Popsicle sticks, birth month, favorite color, or playing card suits. Any method that feels arbitrary and fair.
Tip:Rotate random grouping in periodically rather than using it every session. It works best as a change of pace — if it becomes the default it loses the novelty that makes it engaging.
Management Strategies
What it is:The number of centers you run in a single session should get you to groups of four to six students. Work backward from your class size to find that number — more centers means smaller groups, which means less noise, fewer management problems, and students who can actually focus.
Examples:A class of 24 needs at least four centers to keep groups at six students or fewer. A class of 18 can run three. Start at the lower end until routines are solid, then add.
Tip:Never add a center just to have variety. Every center you add is another set of materials to manage, another routine to teach, and another thing that can break down mid-rotation.
What it is:Rotation length should match how long your students can realistically sustain independent focus — and that varies significantly by grade and by where you are in the school year. A rotation that works for a fourth grader in November will not work for a kindergartner in September.
Examples:Kindergarten and first grade typically max out around 5–10 minutes, and may need shorter rotations early in the year. Grades 2–3 can handle 8–12 minutes. Grade 4 and up can sustain 15–20 minutes with well-established routines in place.
Tip:Start shorter than feels necessary regardless of grade level, especially in the first few weeks. Younger students in particular need more proximity and check-ins early on — plan to circulate more frequently until you have a clear picture of which centers and which students can sustain independence without you nearby.
What it is:A permanently displayed visual that tells every student exactly where their group goes at each rotation — without them having to ask you. The chart should be large enough to read from across the room and simple enough that any student can follow it independently.
Examples:A pocket chart with group name cards across the top and center name cards down the side. A laminated grid posted at eye level with a dry-erase arrow or clip marking the current rotation. A color-coded wheel where each group color points to the next center in the sequence.
Tip:Position the chart where every student can see it from wherever they're sitting. Before the first rotation of every session, have students silently locate their group on the chart and point to where they're going. Thirty seconds of that habit eliminates most transition confusion for the rest of the session.
What it is:A signal before the rotation ends that tells students to wrap up and begin cleanup. Abrupt transitions create chaos — warned transitions don't.
Examples:A verbal heads-up, a secondary timer signal, or a visual cue like a specific color on the classroom light. Whatever you use, make it distinct from the full rotation signal so students know the difference.
Tip:Teach the difference between the warning signal and the transition signal explicitly in the first week. Students who can't tell them apart will either ignore the warning or start packing up too early.
What it is:A defined end state for every center that students can achieve independently. Cleanup isn't the end of center time — it's part of it, and it needs to be planned and taught the same way the activity itself is.
Examples:Chairs pushed in, materials returned to labeled bins, papers stacked in the center of the table, surface matching the posted visual example at each center.
Tip:Post a photo or drawing of what the center should look like when it's reset. Students who can compare their cleanup to a visual standard self-correct without needing you standing there checking their work.
What it is:Clear, taught, practiced standards for what working at each center looks like — volume level, movement, how to get help, what to do when finished. Expectations that live only in your head don't exist for students.
Examples:A brief anchor chart at each center showing the two or three most important expectations for that specific space. A whole-class review of expectations at the start of the first few weeks of centers.
Tip:Empower students to self-monitor by building the expectations into the center itself rather than relying on reminders from you. A student who can check their own behavior against a posted standard is a student who doesn't need you to manage them.
Final Tips for Successful Centers
Start Small and Build
The teachers who run centers well year after year aren't doing anything exotic. They started small, built reliable routines, made deliberate material choices, and treated the first few weeks as a rough draft. Everything in this course points back to one idea: centers exist so you can teach. Every decision you make — how many centers, how long the rotations, how you group students, what the tasks are — should protect and support your small-group time. If it doesn't, it's worth reconsidering.
Key Principles
Two centers running smoothly is more valuable than four centers running poorly. Introduce one or two in the first week, establish the routines, then add. Students need to learn how centers work before they can work independently in them.
If a student can't do the task independently, it doesn't belong at a center yet. Every activity at every center should be something students have already been taught.
Centers exist so you can teach. If you're leaving your table to troubleshoot, your independent centers aren't ready. Simplify the tasks, re-teach the routines, or reduce the number of centers — don't abandon the model.
Explicit modeling and consistent routines early in the year pay off every week after. Students who know exactly what to do at centers — and what happens when they don't — are students who can work independently.
Your first week of centers will show you exactly what needs to change. Watch where students stall, where transitions drag, and where independent work breaks down. That's not failure — that's the process. Centers get better the more deliberately you iterate on them.
At a Glance
Centers take time to build and time to refine. The teachers who run them best didn't get there in the first week — they got there by launching, watching what happened, and adjusting. Take what's useful from this course, leave what doesn't fit your classroom, and treat your first rotation as the beginning of the process, not the end of it.